How to Fix Pain in the Tensor Fasciae Latae (TFL muscle)
If you have tensor fasciae latae pain, you've got an ache along the outside front of your hip. On this page, I'm going to share some crucial ideas to fix your hip pain, and I'm going to share a few videos with specific exercises to help you fix your TFL pain. I'll show you some tensor fasciae latae stretches and some tensor fasciae latae exercises to make sure you get to the root of your pain and weakness.
If you implement what you see here, your hips (and your hip mobility) will thank you!
Quick Overview of the Tensor Fasciae Latae
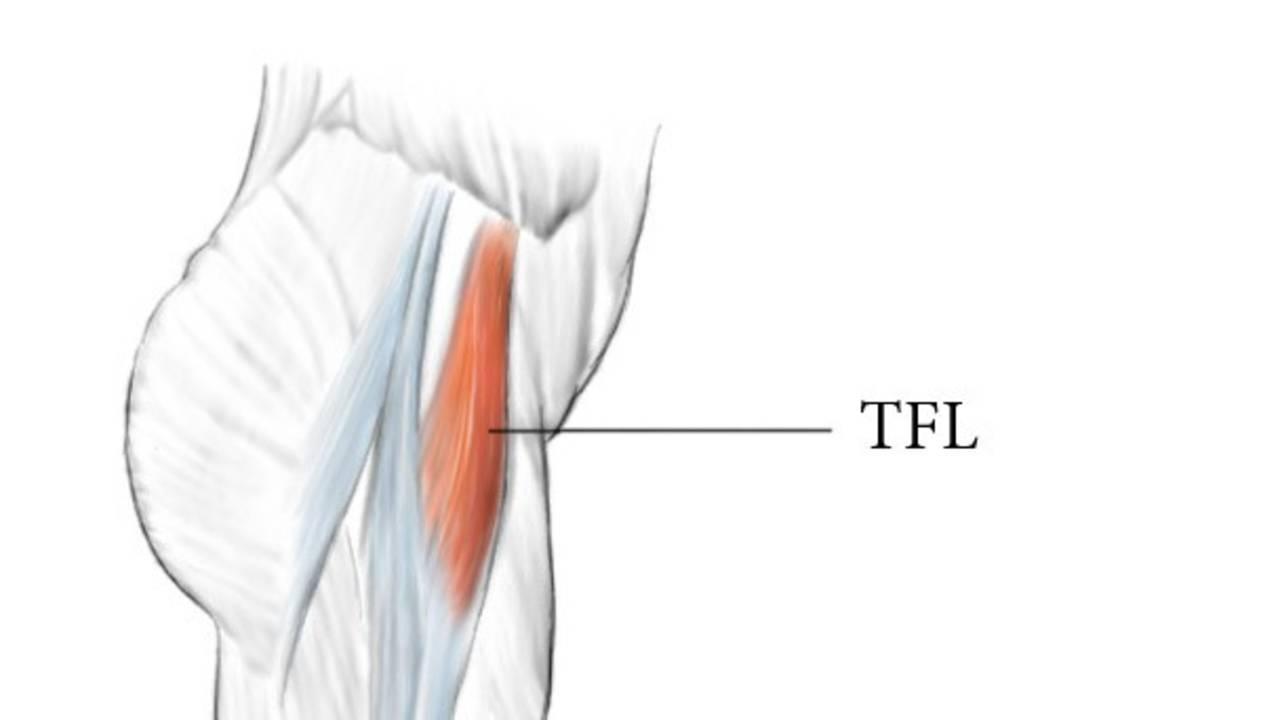
 The TFL is right here on the front, outside of your hip. it attaches to the ilium and blends in with the IT band and attaches all the way down to the lateral condyle of your tibia (shin bone).
It helps you with hip flexion, hip abduction, and hip internal rotation. You can emphasize different actions by positioning your body in different positions (which we'll get into).
When the tensor fasciae latae gets short and stiff, it limits your hip extension, hip external rotation, and hip adduction.
To loosen up a stiff, tight TFL, you may want to massage it. You may to stretch it. So I'll show you how to do both.
When you have pain in the tensor fasciae latae, you might think you only need to stretch or massage it. But don't get caught in that trap.
Sometimes stretching and massage can make your TFL pain worse. Sometimes you have to strengthen a muscle to help it feel better. So I'll show you a few ways to do that too.
How to Massage the Tensor Fasciae Latae
If you have a stiff, sore TFL, massage is a good place to start. There are plenty of theories why self-massage or "myofascial release" might make your TFL feel better, but we're not going to waste our time getting lost in the minutiae. Let's just dive in.
This video explains how to do self-massage for the TFL. Make sure to keep the pressure manageable. If you feel like it hurts so bad that you have to hold your breath, you're using too much pressure. If it feels like you're just crushing bone instead of meat (muscle), don't do anymore and skip ahead to the strengthening exercises.
Spend 1-2 minutes on this 2-3 times a week and be sure to pair it with stretching exercises for your TFL for maximum results.
How to Stretch the Tensor Fasciae Latae
This video demonstrates how to stretch the TFL muscle. Be careful to aim the stretch for that "just right" feeling. It may take a little trial and error before you feel the stretch.
Do NOT push hard into the stretch and cause pain in the knee. You want to feel a light to medium stretch somewhere along the path of the TFL (see the anatomy overview above).
But what if you don't feel a stretch for your TFL?
Not everyone will feel this TFL stretch. If you try this stretch and have great range of motion and feel no stretch, you definitely need to look at the next section. If you are a flexible person and yet still feel "tight," you are not alone. You're what some call "overflexible" or "hyperflexible."
I would say you're flexible AND weak. The place where you're REALLY weak? It's the tensor fasciae latae.
How to Strengthen Your Tensor Fasciae Latae (and Why)
If a muscle feels tight all the time, you probably think you gotta stretch it or massage it more. That's a truism that we all picked up along the way.
But the reality is that muscle atrophy is also painful. In other words, ATROPHY ACHES.
If a muscle is constantly painful, it can be from being too weak. The classic presentation is with yoga practitioners or dancers. You have a super flexible woman who can put her legs in all kinds of positions, demonstrating exceptional hip muscle flexibility.
But her hip muscles feel "tight." When she stretches, she feels relief for a few minutes, and then the sense of "tightness" comes back. The solution is NOT to keep stretching and massaging harder. The solution is to strengthen the muscle.
But what if you're a stiff, inflexible person in general? Does that mean you don't need to do strengthening of your tight hip muscles? No!
As you're stretching muscles, you're teaching them to lengthen. You want to ensure you have strength in those lengthened positions too! I talk about this as building STRENGTH AT EVERY LENGTH.
So whether you're a super flexible dancer or a super stiff powerlifter, strengthening your TFL should be somewhere in your strategy to fix your tight TFL.
First, here's a quick simple exercise to strengthen your tensor fasciae latae. You can do it sitting on your couch or on a regular chair. Go to fatigue. If you feel like you can't breathe, you're doing too many.
If one side feels obviously weaker than the other, do extra reps or an extra set for the weaker side.
You can also do this TFL exercise. It's sometimes called the Reverse Clam, and it will help you strengthen your hip internal rotators.
I strongly recommend starting with a LIGHT ankle weight (like one pound or a half kilogram) on this. You can do it without an ankle weight, but having just a little resistance can really help wake up a dormant muscle. For more on that idea, be sure to check out this video on What to Do When a Muscle Won't Fire.
You'll also want to make sure all your hip flexors are working together. If you have very weak upper quads and/or your psoas isn't doing its job, your TFL may be complaining because it's pulling double or triple duty.
This video will help you with a few different ways to strengthen your hip flexors. Recommendations for frequency show up towards the end of the video. Generally, two to three times a week and don't cripple yourself with soreness!
And this one gives a really good option for strengthening the hip flexors in a lengthened position (remember I said "STRENGTH AT EVERY LENGTH"?). Again, don't cripple yourself with soreness by doing these every day. Two to three times a week with a decent amount of fatigue is fine. You don't need to be grunting and groaning to make improvements.
With these TFL strength exercises and the preceding stretches, you should be good to go.
What I Would NOT Recommend for TFL Pain
I've seen incredible stories from people with pain in the TFL. Desperate for relief, they end up at a surgeon's office who recommends cutting the muscle to "relieve" the pain.
I am not a doctor, and I don't think you need to be a doctor to understand why this should be viewed with extreme skepticism and caution.
The ONLY thing that moves your bones through space is your muscles. Cutting a muscle loose to reduce a sense of tightness is insane. It means you will lose normal function of the hip forever. The intricate web of hip muscles that remain intact will need to compensate for that permanent injury forever.
While hopefully there will be some temporary relief of pain in the tensor fasciae latae from such a surgery, you are virtually guaranteed to have other discomfort arise as the other hip muscles compensate for the loss of function. The new aches and pains could be around the hip, knee, back, or ankle. Heck, if your compensatory patterns spread enough, you could end up with shoulder issues.
There's no telling how the negative effects might show up, but I can guarantee there are no rigorous scientific studies to identify these issues. After all, there's no money in doing good science on orthopedic surgeries. And that's not intended as an attack on surgeons.
The entire modern western medical system is built on expensive procedures. Orthopedic surgeries provide big revenue for hospitals and insurance companies, so there are no financial incentives for anyone to question the efficacy or safety of orthopedic procedures. That's why even surgeries that are shown to be no better than placebo continue to grow in popularity (like knee meniscus and shoulder impingement surgeries). You can read more about the sordid truth and history of orthopedic surgery here.
Summary
If your tensor fasciae latae feels painful or tight, massage and stretching exercises might help. If stretching and massage help, great! Make sure you add in strengthening exercises as you lengthen the tensor fasciae latae. If massage and stretching for the TFL don't help, make sure you focus on the strength exercises to relieve tightness in the TFL.
And if you want a structured, simple, and practical program to improve your hip flexibility and strength, be sure to check out the Healthy Hips program.

